
Microsoft Azure CLI Commands | Virtual Machines
The industrial revolution has brought us a degree of wealth that would have seemed unimaginable to our ancestors and it’s all thanks to the phenomenon known as economy of scale.
IKEA factories can pump out a desks much faster than an individual building them by hand. In the same sense, we can obtain more computational resources (i.e. a server with better specs) at the same cost by using the infrastructure of tech giants instead of purchasing the hardware ourselves.
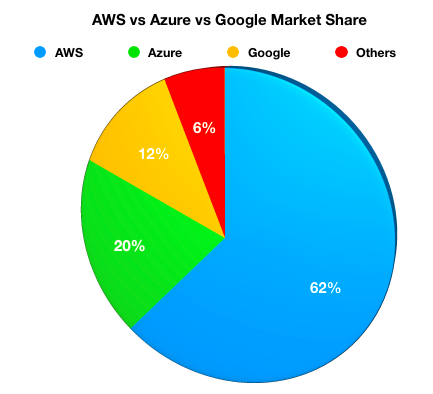
The current world leaders in cloud computing are Amazon Web Services (AWS) proceeded by Microsoft’s Azure then the Google Cloud Platform.
In this article, we’ll be taking a look at how to create a virtual machine in the cloud using Azure.
Go ahead and sign up for Azure, if you haven’t already. You are required to put down a credit card however when signing up they will give you a credit of $250 in addition to all the services offered within the free tier.
Microsoft Azure Cloud Computing Platform & Services
_Microsoft Azure is an open, flexible, enterprise-grade cloud computing platform. Move faster, do more, and save money…_azure.microsoft.com
Once you’re logged in, search for billing.

Click on the free trial row under subscriptions.

On the proceeding page you can monitor how much credit you have remaining to avoid getting charged.

In the proceeding section we will be using the Azure CLI to deploy virtual machines rather than create them through the UI. We can run commands directly in the browser by going to the following URL.
[https://shell.azure.com/bash](https://shell.azure.com/bash)
Note:

Like the human body, applications are systems composed of many working parts. Your application might be made up of a web server, database, 3rd party service, etc… In the context of Azure, the latter should be group under a single abstraction known as a resource group.
Before we can create a virtual machine, we must initialize a resource group. az group create requires us to pass a name and the location of the data center whose physical servers will be used to run the virtual machine.
az group create --name myResourceGroupVM --location eastusWe can run the following command to view a list of the most commonly used images.
az vm image list --output table
Notice how all the Urns have the latest tag. You might run into situations where you need to stay at a specific version of an operating system. We can run the following code to view all the available versions for a specific distribution.
az vm image list --offer CentOS --all --output table
A virtual machine size determines the amount of compute resources such as CPU, GPU, and memory that are made available to the virtual machine.
az vm list-sizes --location eastus --output table
MaxDataDiskCount
Number of hard disk drives (HDD) or solid state drives (SSD) that can be attached to the virtual machine.
MemoryInMb
Random Access Memory (RAM) size.
Name
Name of the virtual machine size corresponding to a certain set of specs.
NumberOfCores
Number of physical/virtual CPUs per chip.
OsDiskSizeInMB
By default, two disks are automatically attached to the virtual machine. Virtual disk whose memory is allocated to the operating system. The disk caching configuration of the OS disk is optimized for OS performance. Ergo, OS disks should not be used for applications or data.
ResourceDiskSizeInMB
The temporary storage drive is present on the physical machine which is hosting your VM. Therefore it can have higher I/O and lower latency when compared to the persistent storage like data disk.
Anything put in temporary storage may be lost during a maintenance event or when you redeploy a VM. During a successful standard reboot of the VM, the data on the temporary drive should persist. However, there are cases where the data may not persist, such as moving to a new host.
That’s enough background information, let’s create a VM.
az vm create \
    --resource-group myResourceGroupVM \
    --name myVM \
    --image UbuntuLTS \
    --admin-username azureuser \
    --generate-ssh-keys
From the output, copy the publicIpAddress to your clipboard, this address can be used to access the virtual machine.
ssh azureuser@publicIpAddressOnce inside, it’s no different than a server running inside of your network. When you are finished, you close the SSH session using exit.
Your VM can be in different states. The only thing worthy of note here is that stopped virtual machine still incur compute charges.

The following lines return the state of the VM.
az vm get-instance-view --name myVM --resource-group myResourceGroupVM --query instanceView.statuses[1] --output tableLet’s deallocate the VM to avoid any additional costs.
az vm deallocate --name myVM --resource-group myResourceGroupVMDeleting a resource group also deletes all resources contained within, such as the VM, virtual network, and disk.
az group delete --name myResourceGroupVMWe can see if we successfully deleted the resource group by running az group list.
Sources:
Technical documentation, API, and code examples
_Get the latest Microsoft documentation for end users, developers and IT professionals: API reference, code examples…_docs.microsoft.com
Cory Maklin
_Sign in now to see your channels and recommendations!_www.youtube.com